
A portable generator is any device that has the capability of providing power during an emergency, time of power loss, recreational purposes or when working in a place which is away from electricity supply. Nonetheless, like any other device, they may fail to respond even after their services are called upon. This is a troubleshooting guide for those who want to be able to easily diagnose many common portable generator problems and continue providing power. Doesn’t matter if the generator does not respond at all, or there is electricity but it is unbalanced, or it is full of bulletins — we will teach you how to take it apart to fix it. Having read this article, you will do so easily in all desperation, and you will no longer be filled with anxiety whenever you have such issues where electricity must be available in scarcer supplies.
Understanding of Your Generator

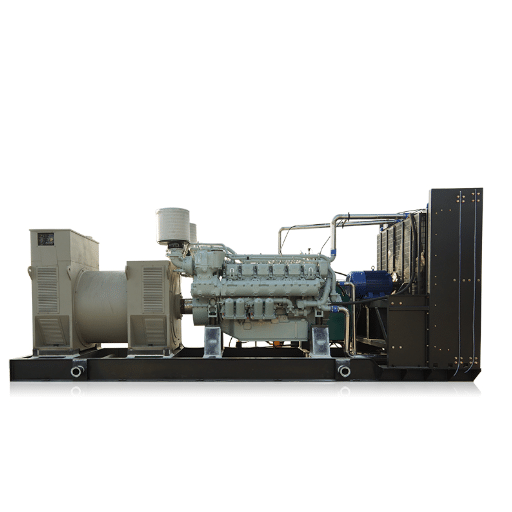
For optimal performance and effective problem-solving, the knowledge of the basic parts, such as stand-by generators, for instance, is essential. An average portable generator includes the engine, alternatively, fuel system and the voltage regulator and control board:
Engine
The driving force of the generator is the motor which usually utilizes gasoline, diesel or gas. It is imperative to change the engine oil and air filters on a regular basis in order to effectively run the system.
Alternator
Transforms the power generated by the motor into electricity. When the generator head is poor more power will be delivered.
Fuel System
The system that feeds fuel to the motor. If there is an issue, like when the hand starts hesitating about fuel passing through the pipes, it could be as a result of clogs or leakages in the fuel pipes.
Voltage Regulator
Maintains the quality of the voltage output of the generator. If troubleshooting here is not done well then power will start fluctuating.
Control Panel
That which you use to communicate with the generator, or one that, for example, shows how much the voltage and the fuel inside it.
Common Components and Their Functions
| Component | Function |
|---|---|
| Engine | Converts fuel into mechanical energy |
| Alternator | Generates electrical power |
| Fuel System | Supplies fuel to the engine |
| Voltage Regulator | Maintains consistent voltage output |
| Cooling System | Prevents overheating during operation |
| Exhaust System | Expels combustion gases safely |
| Lubrication System | Minimizes friction and wear in engine parts |
| Battery | Provides initial power to start engine |
| Control Panel | Interfaces for operation and monitoring |
| Frame/Base | Provides structural support and stability |
How Your Generator Should Start
The starting arrangements of different types of generators, however, differ depending on the design, fuel used, and application but still incorporate the basic principles. When you begin the denting process, make sure that there is enough fuel in the fuel tank of the generator, also the oil levels should reach the maximum level as specified in the manufacturer’s manual. Visually inspect the unit for any damages and obstructions and make sure all switches and circuit breakers are located correctly. In the case of a generator where the choke is located on it, set the choke to the cold start position, if recommended on your generator, until it starts working properly.
Generators that require manual activation, however, which usually indicates that people have to put in effort, are usually started by using a pull cord to prime/start the fuel. On the contrary, such generators as the automatic or electric start ones that are usually activated using a battery are started by pressing a button or turning the key enabling the battery-ignition system. In technology, there are generators that can start remotely using smartphones or computers due to the existence of smart technology in them.
Temperature and other issues related to the working conditions surely influence starting performance. Motor oil shortly thickens more under freezing cold which requires more cranking power, block the motor sufficiently or turn on a block heater. If taken together these steps will help to improve the standard process of starting up a generator according to its specifications provided in the operating guide.
Common Reasons Why Your Generator Won’t Start

-
01
Empty Fuel Tank
Make sure that the ignition is supplied with the proper fuel. A little or empty tank is one of the most common reasons why the engine doesn’t start up. Remember to always check the fuel levels first before operating it.
-
02
Dead Battery
If there is a problem with the battery the generator may not crank. Carry out voltage tests on the battery and replace or charge it if it is sufficiently low for the generator to crank.
-
03
Clogged Air Filter
It may be hard to start the engine if the air filter is either dirty or blocked. Therefore, it could be wise to keep the air filter clean or, better still, replace it as frequently as possible.
-
04
Faulty Spark Plug
The energy required to fire the engine may not be enough if the spark plugs are not proper. Check the condition of spark plug, and replace it if heavily worn, carbon dirty, or broken.
-
05
Old or Contaminated Fuel
Fuel that has turned bad or is contaminated may cause the fuel lines to be clogged or damage the engine. It is advisable to clean out and replace the petrol from old tank and also the use of fuel additive while the generator is inactive for an extended period would be a good idea.
-
06
Tripped Circuit Breaker
Make sure the power generator’s main switch is in the on position. In case the breaker is off, turn it back on properly following the respective guidelines.
-
07
Low Oil Levels
Most generators come equipped with an intelligent warning system that automatically shuts down the generator when oil has reached a dangerous point. Always ensure oil is present in the engine and put some more if required.
-
08
Carburetor Issues
If the carburetor gets dirty, the engine may fail to obtain the desired amount of fuel mixture. Cleaning or a proper maintenance of this component could be the solutions to this problem.
Fuel Issues: Gas and Natural Gas Problems
The problems associated with fuel are a main factor which contributes to inefficiencies and breakdowns in the operation of a generator. In particular, when it comes to gas generators, one needs to be alert to bad quality fuel. Oxidization and evaporation processes can cause petrol to deteriorate and filter gum and varnish substances in fuel pipes and carburetors. For this reason, fuel additive is advised in case the generator is kept idle for long periods of time, and the fuel is recommended to be exchanged for fresh gas for better performance.
When it comes to combustion for the sake of a natural gas-powered engine, gas supply pressure is in many ways the key concern of safety. Using insufficient gas pressure can make combustion incomplete, reduce efficiency or even prevent the engine from starting. To make sure the system is fully compliant with all the necessary norms, it is important to carry out periodic checks of the pressure reduction valves and pipelines, to make sure they are operational and deliver pneumatic pressure within the manufacturer’s norms. Moreover, the occurrence of gas line leaks is a source of operational and safety concerns and should be handled immediately with the involvement of licensed plumbers.
Battery and Electrical Failures
Recent studies have shown that systems with electric components that are properly maintained experience fewer faults on average by almost 40%. Equipment used for diagnostics like multimeters and infrared thermographs is reliable even in such cases saving on time.
The common causes for equipment downtime are battery and electrical failures, especially in systems where electrical power is the source of energy. Under certain circumstances, the batteries are sources of failure since they develop sulfation layers as they age, overheat or are not maintained in the proper way, which causes them to operate at reduced capacity and later wear out. It is important to adhere to the charging and maintenance schedule as advised by the manufacturer so as to reduce such risks. Voltage and load tests should be performed on a regular basis to verify the performance of the battery and identify any problems in a timely manner.
A good number of power distribution failures are results of bad wiring, weathered interconnection elements, or malfunctioning of devices such as switches and fuses. By nature of these weaknesses, even exacerbation of the problem is possible when such an electrical circuit is made in excess of the limit or is subjected to other issues, including dampness. Generally, acting on such electricity-related problems earlier prevents any future damage to the systems, and ensures that the technical equipment is in use longer and without any breakdowns.
Mechanical Problems: The Crank and More
Studies have established that if the proper balance of the crankshaft assembly is not achieved, vibration levels increase. This has the effect of wasting system power due to excessive vibration — causing a loss of not more than 15% on the global efficiencies of the engine.
Present in internal combustion engines, the crankshaft serves as a very important engineering gear which helps in the process of transforming from linear motion to rotary motion. Due to architectural defect, deficiencies in engineering designing or operating conditions, the condition of the encountered crankshafts may sometimes lead to failure making the machine unusable. Assuming it is achieved, inaccurate generation of the part will lead to defective assembly, thereby reducing the product’s efficacy.
Step-by-Step Troubleshooting Tips

-
1
Identify Abnormal Noises
To avoid dangers which can damage an engine, check for unusual engine sounds such as knocking or scratching which could be due to the wearing out of the shaft necks or misalignment. To make it more effective in medical practice, use stethoscopes or vibrodiagnostics.
-
2
Inspect for Visual Damage
Thoroughly inspect the journalling spots and crankshaft for signs of wear as well as any damages. Ensure the main bearing spacing and crankpin surfaces are not tarnished or marked.
-
3
Measure Vibration Levels
To enhance a machine’s performance, vibration analysis may be used to monitor and compare the vibrations of rotating parts against the manufacturer’s normal values.
-
4
Conduct Oil Sampling
Study the engine oil content for the possible presence of metal particles or unburned particles, which may typically result from internal wear or lubrication problems. Evaluate the oil analysis findings for comparison with those of the first used sample.
-
5
Verify Alignment
Observe the deflection of the crankshaft using high precision measuring instruments. Dislocation may result to high wear and vibration environmental which may in the long-run affect the system’s effective operation.
-
6
Consult Manufacturer Specifications
Confirm the results again by checking against the recommended acceptable tolerances and the periodic compatibility lists of the vendor. If any components do not meet these criteria, replace and repair them according to the schedule.
Initial Checks Before You Start
The principal step towards every repairing and maintaining service is to make sure that irreproachable preliminary check is accomplished. This is the most important and crucial step in the maintenance process, and in essence it involves collection of the system documentation for study, namely, operation manuals, schematic plans and more. At the station, endeavor to review work conditions and eliminate those hazardous situations such as substances, sharp objects, etc. that do not create good working conditions.
Furthermore, it is important to check that all the required instruments and accessories needed for the task are well serviced and properly set so that the maintenance tasks are well done and safely as required. Use of instruments that have not been calibrated may result in a wrong measurement or cause wrong diagnosis leading to poorly done repairs. What is more the system is verified since there is need to look at the equipment and inspect it before the tools are used. This helps in identifying components and circuits of concern that must be attended to first.
It is essential to take care of the right Personal Protective Equipment (PPE) so that each activity has the PPE in place and that the staff follow safety procedures. This prepares a positivity foundation that will aid in a stable check up of the process ahead when relevant industry data and maintenance trends combined with the above checklist.
How to Diagnose Fuel Supply Problems
Diagnosis of the problems experienced in the fuel system should take a structural route, so that one can point out the likely causes and, in trying to correct the malperformance, do so most effectively. Start by examining the basic mechanical layout of the system. Fuel tank, fuel lines and fuel pump included. Find out if there is any visual damage, leaks or obstructions in any parts. Give special attention to fuel flow disrupting conditions like rusting, loose couplings in the lines or burst hoses. After this, note the pressure in the fuel rail using a fuel pressure gauge. Review the pressure measurements and the fuel pump’s and the pressure regulator’s characteristics of the vehicle to validate the fuel pressure gauge indications. Pressure levels that are above or below normal may be the result of a faulty fuel pump, a dirty fuel filter, or an ineffective pressure regulator.
Also, it is needed to check the working capacity of the fuel injection equipment. It involves appropriate tools for evaluating the liquid trajectory, the speed of fuel supply, and the state of health of the fuel injector. If there are any problems, it is possible that the fuel is burned unevenly. It sometimes depreciates even the efficiency of the engine. Study the fuel quality at certain. Avoid using any fuel which is contaminated with water, dirt or other impurities or alcohol. Fuel adulteration is more often resolved by draining the system, installing fresh fuel and servicing the relevant sections to clear the contamination.
At the end, load a more responsive multi accessory tool that can be geared to retrieve the fault codes out of the Engine Control Unit (ECU) within the specific vehicle. Such codes help to point out malfunctions in the electronic makeup of the fuel system such as malfunction of a given sensor or malfunction of wiring. These steps are detailed on how fuel supply error can be diagnosed in terms of parts failure which in turn poses further possible operations to the vehicle in a safe manner.
Checking the Electrical System and Battery
When inspecting and testing of the electrical system as well as the battery, the investigator examines first the terminals, and then the cables for any visible changes such as corrosion rated signs in the wires fittings, disconnections, and physical damages. An external current will be measurable based on the condition of the terminals, however, they must be cleaned using a steel brush and a preventative measure applied that prevents them from getting corroded again in future. In order to know the energy contained in the battery, a voltage test is carried out using a multimeter, and a charged battery produces exactly 12.6 volts. In case the reading obtained is below this limit, it means the battery has discharged and therefore the urge of replacing it or even charging it.
With the above considered, move on to test the alternator’s performance and apparently discharge most of the electrical power that the battery holds in addition to the power that it still generates. To carry out this test, you will use a voltmeter. The voltage on the DC side of the alternator in normal operation is typically 13.8 V to 14.2 V. Inspect the alternator drive belt for visible signs of wear, cracks, or misalignment. These factors may also limit the amount of charge contribution. Examine some other components within that range which are the fuses, relays, and wiring harnesses for any potential problems or disconnections. Some vehicles have advanced sensors and controls fitted within the electrical system.
Maintenance Tips to Prevent Starting Issues

-
Regular Battery Inspections
Prevent the accumulation of corrosive materials on the terminals or loose connections by regularly reviewing the battery terminals and cables — use a battery terminal cleaning kit and make sure there are no sources of caustic or deliquescent acid. Rather, replace the battery when the old one has been utilized for 3 to 5 years.
-
Test the Starter and Alternator
Make it a rule to regularly check the starter and the alternator and make sure they work correctly. In good time problems concerning given components can be exposed and unexpected starting failures avoided.
-
Keep Electrical Components Dry
Avoid exposing the electrical components into moisture by fixing securely the wiring and the connectors. Keeping this in mind, as corrosion will lead to trouble in starting by messing up the electrical system wiring connections.
-
Use the Right Fuel and Oil
It is important to always select the right engine fuel and oil that is recommended for the specific car brand since in most cases, the use of substandard ones could well reduce the combustion and starting efficiency especially during cold seasons.
-
Address Warning Signs Promptly
Look out for warnings by noticing the lighting on or weird sound while starting the vehicle, as these can be the early detection of a problem. If such problems are detected, then it may save the owner a lot of money if the faults are attended to as soon as they appear.
Importance of Fuel Quality and Storage
The standard that fuel is maintained in as well as how it is housed are regarded as important variables that can affect the functioning, efficiency, and expected service life of an engine. Good fuel which is used further minimizes engine deposit construction, which hampers the fuel injection and affects performance with time. Alternatively, water and debris may enter the engine due to poor quality of fuel that may result in corrosion, misfire, or decrease in power output. This is why storage is emphasized because it is very unlikely for these contaminants to affect the fuel. In accordance with the proposed guidelines, long term storage of fuel should optimally observe that the fuel will remain unadulterated through such means such as the use of weatherproof, clean, airtight containers that have been specifically designed to resist vapour losses and limit moisture access including evaporation.
Besides, these external conditions, for example, temperatures, humidity levels, and so on, should be taken into account because very high temperatures, for example, can be a source of condensation within the fuel tanks and degradation of fuel due to the ingress of water. Another significant step in keeping the fuel for longer is the fixation in the fuel of the fuel stabilizers that are recommended by the industries cause this prevents oxidation and the formation of sludge. Regular assessments on the tanks carrying fuel or on buildings are very important in finding ways of deterring possible faults such as leaking and development of bacteria that can disrupt the quality of the fuel.
When to Seek Professional Help
When you find out that the amount of dirt in the fuel is beyond what you can handle, seek professional guidance. If the system has problems ranging from major phenomena like gas tank corrosion to minor problems like continuous bacteria multiplication, then certified fuel technicians should be contacted. They are presented with the equipment like microbial sample takers and/or agents for seeking water or other solid impurities without necessarily drawing the samples. Moreover, these specialists can offer fuel tanks virtual maintenance as well as biocide expertise programs to rectify the fuel quality.
Another important thing is that if the engine has a fuel quality issue — this can be decreased running potential, increased exhaust gas levels, or the injectors getting worn out — it is highly recommended to get a specialist to check the car for any malfunctioning. These specialists are able to offer comprehensive diagnostics and fixes to eliminate disruptions and forestall the occurrence of costly damage in the long run. In addition, going to people who know more about a given problem early enough, in this case about use of fuel based mechanical systems, is also encouraged to allow smooth, regulated and compliant operation.
Getting Your Generator Started Again

Check the Fuel Supply
Make sure there is enough fuel in your generator. Should you have stale or contaminated fuel, please change it with the clean fuel as indicated by the manufacturer directions.
Inspect the Oil Level
An inadequate amount of oil in the generator may mean that it will not start. With the use of a dipstick, check the oil and also fill with the oil specified as required.
Examine the Battery
Please check if the battery is charged and installed correctly. Make sure to switch the weak battery with a new one or recharge it instead.
Inspect the Air Filter
If an air filter is clogged, the flow of air into the generator will be obstructed making it ineffective to start. Be sure to change the filter if is necessary.
Prime the System
If your generator has an overdue priming function, try to pump some fuel to ensure that the fuel is in the engine manifold.
Test the Spark Plug
This step pertains to removing the spark plug and checking its condition. Replace if necessary or clean if necessary.
Attempt to Start
Carefully step through the initial power-up sequence for your standby generator, such as advancing choke control levers or changing fuel valves as required.
Seek Professional Support
If you have done all that and the generator remains inoperable, get in touch with a licensed electric technician for proper maintenance. Remember that safety is the most important aspect when the equipment is being diagnosed.
How to Properly Crank Your Generator
- 1.
Inspect Fuel Levels and Quality
A necessary precaution to take is to investigate the available contents of the fuel tank right before the generator is turned on. Be informed that if there is old fuel, water, or other foreign materials in the fuel tank will lead to poor engine performance as it will fail to start.
- 2.
Examine the Oil
Most modern generators have safety procedures that are triggered in case the oil is too low or is of poor quality. You must test the oil levels in the generator using a dip stick — it should not be too low from the appropriate level; besides, top up or replace the current oil and refill with the designated type as advised in the generator manual.
- 3.
Verify the Air Filter
When an air filter of a generator is blocked or choked, the engine is starved of air and it cannot function properly. You will find it necessary to take out the air filter so as to clean it soon or serve it according to the adjustments that should be followed for the air filter assuming you will be operating the generator.
- 4.
Inspect Battery Connections (Electric Start Models)
In the case of devices containing an electric start, it is important that the battery posts are firmly grounded and without rust. If necessary, recharge or replace the battery in order to support operational efficiency.
- 5.
Set Switches and Controls
Place the generator move lever at the right start location. Once the fuel valve is switched to the “on” position, adjust the choke according to the weather, and afterwards, place the power switch at the “on” mode. Noteworthy, the settings might vary accordingly but the main principle of it is switch it off.
- 6.
Pull the Recoil Starter or Activate the Electric Start
When the manual start models are involved, hold the recoil starter handle, and jerk the cord while it is edgewise and in return so as to prevent the rope from snapping. With electric-starting devices, push the start guide or key-start the machine, waiting a few seconds for the engine to ignite.
- 7.
Warm-Up Period
After commencing the generator, let it run on a slow speed, on idle, for several minutes. This step reduces vibrations in the engine, and facilitates the smooth flow of oil before connecting any load has been put in place.
Final Checks After Getting It Running
After the generator starts, it is of utmost importance to make sure that it works properly. Thus, check all the appliances located at the output of the generator and be sure that they do not consume more than the output specified in the generator manual to avoid an overload and the corresponding violation of the work or unauthorized re-routing of the electricity. Look at the settings on the control panel. If the red light comes on, this means the most urgent intervention is well called for. Also, provided relevant instruments are available (multifunction generator control switch), it does not impede monitoring voltage or frequency fluctuations in any division.
Besides, examine the exhaust system. Make sure it is unblocked and if not so move it to a naturally open area as carbon monoxide is a danger to human health. Every now and then, kindly listen out for any strange sounds as can be reported due to some components failing to retract from where they have been forced to move. Stabilising the system against such instabilities helps in ensuring that the generator will operate efficiently, continuously and also safely during its useful time.
Frequently Asked Questions
Why won’t my gas generator start?
When you have troubles getting your generator to work, begin by checking if the gasoline is not expired and in case the gas is bad or old, introduce some new gasoline. Next, check the spark plug and spark plug wire for any damage. If the electrode is worn, the spark plug needs replacement, as well as the addition of the ignition coil and wire to the coil. Turn the key to the first position on the accessory switch and observe both the oil sensor and the oil level since other models would require oil to be added if it is missing and finally, charge the battery if the starter motor is not turning over the engine. If the generator goes on and off quite fast, either the carb/jet needs cleaning or the carburetor needs to be separated or purchased.
How do I troubleshoot a gas generator that cranks but won’t fire?
In case the engine is unable to start, turn off the key and observe the connections. Check the terminals of the ignition wire and ensure it is securely connected and all ground connections are tight. Pull out the distributer lead wire and check the diaphragm and cables. Carefully pull and disconnect the ignition system wires and always start by removing the high-tension wires. Resist the temptation of slamming in a hard wire as routing all the wires to their correct location can prove quite difficult.
What troubleshooting tips help when a gas generator won’t keep running smoothly?
For the smooth running of a generator, it is important to use fresh fuel, store the engine with fuel conditioner to avoid fuel jet clogging, and prevent using already expired gas if it smokes and stops working because it begins to fail. In case after it appears to be well and running then it dies, the carburetor and the fuel filter may need to undergo cleaning and replacement though. The exhaust system should be checked, and the intake should be monitored along with the flow of the air in it, and if the oil is low, another drop can be poured into the engine to keep the oil sensor from cutting off the power upon the generator.
What should I do if the starter motor won’t crank the gas generator?
First, the condition of the battery checks include the battery power output by the aid of the use of a charger, as well as the performance of the generator using a healthy battery. Analyze the start button and starter connections, as well as the condition of the starter motor; be sure to disconnect any fail-safe systems that may interfere with starting such as the stop circuit or the reset buttons, these must be released. There are certain signs that may indicate the motor is stuck, including not being used for a long time. Also whether it will crank in the event of putting some starting spray in comparison to putting too much is another test. In case the starter is faulty, it is necessary to remove and probably replace or, if it is not possible, rebuild it.
- Automatic Time Table Generator Using Heuristic
academia.edu — Read more here - Techno-Economic Study of Producing Green Hydrogen with Stand-Alone Hybrid Renewable Energy System
ucpress.edu — Read more here