

A home standby generator is an essential investment for maintaining power during unexpected outages, ensuring safety, convenience, and uninterrupted operation of critical appliances. This guide provides a detailed, step-by-step framework for understanding and executing the installation of a home standby generator. From selecting the right generator model to choosing an optimal location and ensuring compliance with safety regulations and electrical codes, this article delivers a comprehensive resource for both homeowners and professionals. By following this guide, you will gain the technical knowledge necessary to securely integrate a standby generator into your home’s power system, providing long-term reliability and peace of mind.
Where should a home backup generator be installed?
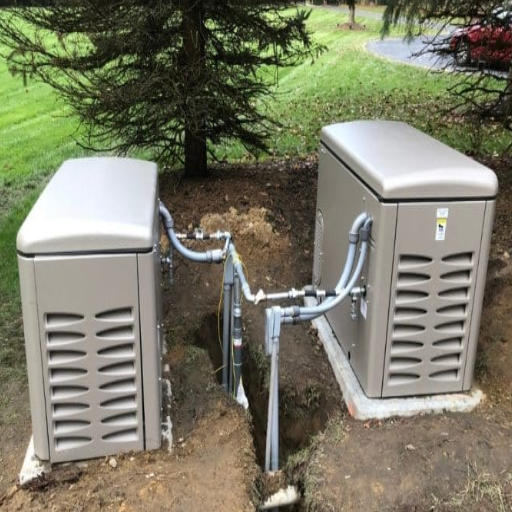
Ideal placement locations for your standby generator
I consider many factors when deciding on the location of a standby generator. Safety, efficiency, and regulations are some that come to mind. I know that a standby generator has to be at least five feet away from doors, windows, and vents to prevent the risk of carbon monoxide entering the house. Additionally, I make sure that the standby generator is put on a stable flat surface, either concrete or composite pad. In terms of safety, a flat surface also ensures it does not tip over.
To avoid overheating the generator, I also make sure that there is at least 18 inches (0.5) of space on all sides and above the generator. The placement position should also be outside, away from combustible materials. From a maintenance perspective, it makes connecting and servicing the generator easier as it can be placed near the electrical panel. Keeping these things in mind can greatly simplify the routing of the fuel line, adding more safety to the process.
Alongside maintenance regulation, I also focus on ensuring that local zoning laws and company recommendations are followed. This builds the guarantee that code restrictions will be met while keeping the generator warranty intact. Following these rules ensures a safe, effective, and compliant place for the standby generator.
Required clearances and safety considerations
Correct clearances should be held for safe and effective operations of standby generators. The generator must be installed five feet (1.5 meters) away from the building’s windows, doors and ventilators. This prevents harmful exhaust fumes from entering the structure. Furthermore, most manufacturers recommend setting the generator away from exterior walls by at least 18 inches (0.5 meters) for proper ventilation and avoiding overheating.
Equipping the generator with a concrete base ensures the unit’s stability during operation as well as prevents combustion. The base should be non-combustible and flat to minimize vibrations. Moreover, holding a distance of 36 inches (0.9 meters) on all sides of the unit ensures ease of access for maintenance and complies with the manufacturer servicing regulations. In addition, there should be a distance of at least five feet from the unit to the vegetation or combustible material to minimize fire hazards.
All wiring must be fixed following the NEC standards to guarantee electrical safety measures compliance. Propane and natural gas setup fuel lines must meet local building requirements, as well as be properly secured to prevent leakage. All of these technical measures combined guarantee the highest level of safety and efficiency of the generator system.
What does the standby generator installation process involve?
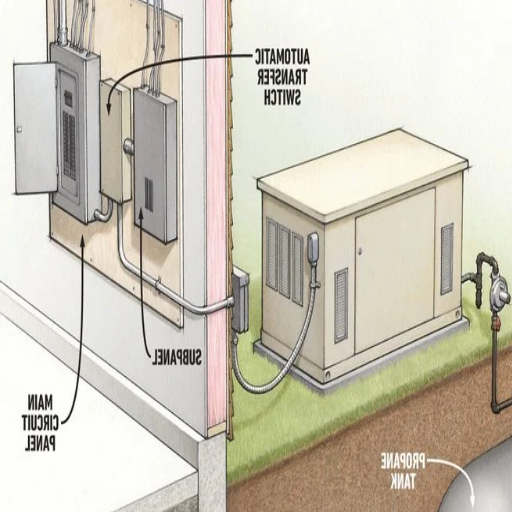
Transfer switch installation and automatic transfer setup
The installation of a transfer switch is important when setting up a standby generator, because it allows seamless integration for the electrical power transfer from the utility grid to the generator in case of an outage. The transfer switch must be sized accordingly with the generator and the building’s electrical systems, which is usually between fifty amps to four hundred amps for most residential and commercial use.
The transfer switch is positioned away from the main electrical panel to minimize the amount of cable used, and connections made to integrate the switch into the electrical system of the building. For Automatic Transfer Switches (ATS), modern systems are highly recommended because they have sensors that detect outages and automatically start the generator, which minimizes downtime and alleviates the need for manual control.
- Voltage Compatibility: Check that the ATS’s voltage rating corresponds with the ATS’s and service panel’s voltage rating (typically 120/240V for residential use).
- Ampacity: Rated for the maximum draw of the building’s electrical power demand to avoid overload conditions.
- Switching Mechanism: Has a requirement of having time delays (approximately 30 seconds) built in to mitigate unwanted operation during brief power surges.
- Control Wiring: The generator is connected to the ATS by low voltage control wires which permits the communication for automatic start and stop commands.
After the installation is completed, appropriate testing, including load simulations, must be done in order to confirm the operability of the transfer system and check conformance with the engineering and safety requirements.
Connecting your generator to your home’s utility power
Just like with all-electric systems, when linking your private generator to your home’s utility power, how the equipment is laid out and the safety measures taken must be correctly executed. The steps are of technical and procedural nature and include the following:
- Transfer Switch Installation: This can be done using a manual or automatic switch. The generator has to be separated from the utility supply to avoid backfeeding which is hazardous to utility workers and generators. Ensure that the transfer switch that has been selected will perform the duty your home requires, 100 or 200 A, and it also meets National Electrical Code requirements.
- Generator Sizing: Cross check if the power output of the generator matches the critical power requirements of your home. A 7kW generator can manage essential appliances, large units around the house need 20kW or greater.
- Circuit Selection: Decide which circuits must be powered out of the possible those that can be powered and in this case, it is assumed all can. Prioritize important circuits, HVAC systems, refrigerators and in some cases, medical equipment. Do not forget to add all the outputs together to ensure greater output and capacity from the generator.
- Grounding and Bonding: To minimize the chances of getting an electrical shock or fire, make sure the generator is bonded and grounded.
- Voltage and Frequency Monitoring: Check that the generator output is steady. Connect Automatic Voltage Regulators AVRs or their equivalents to prevent damaging connected equipment from voltage oscillations.
- Utility Power Restoration Protocol: The system should be configured for automatic reconnection once the utility power is restored. This makes it possible for the ATS to keep track of the voltage and frequency of the utility supply and close the switch once the parameters return to normal.
Follow the necessary test procedures meticulously, including the load tests and the simulated failure of the utility power, to ascertain the dependability of the system and requirements of the applicable technical and safety standards.
How do you hook up a generator to your home’s electrical system?

Understanding the role of the transfer switch
Without a doubt, the transfer switch has an integral role in the secure and effective use of a standby generator in the electrical system of a house. Its primary role entails isolating the home from the utility grid when a power failure takes place and switching power from the grid to the generator.
- Ampacity Rating: The transfer switch must comply with the generator’s maximum output and the house’s electrical service rating, which are often 100A, 200A, or 400A.
- Voltage Compatibility: Check that the switch is compatible with the output of the generator which for residential systems is usually 120/240V.
- Number of Circuits: Look for a switch that meets the number of circuits that are to be powered during an outage which can range from a whole home solutions to critical loads only.
- Enclosure Type: The switch should be rated weatherproof for outdoor installations.
Compliance in the installation and configuration of the transfer switch with electrical codes is important in ensuring reliability, safety to the system and associated equipment, and the grid infrastructure. It is advisable to let a licensed electrician do the installation in order to comply with local regulations and standards.
Testing your whole-home generator after installation
Checking the entire home generator is necessary for performance and safety accuracy. To check correct performance follow these instructions:
- Checkup: Make sure all of the electrical connections, inclinations, and exhaust fixings are complete according to the NEC and manufacturer guidelines. Look for loose fittings or any damages.
- Simulated Power Outage Test: To check the engagement of ATS, switch off the main utility power supply. Look for faults and delays during the transfer process.
- Load Testing: Incrementally add voltage to the generator while checking for real-world sustenance. Constantly check if the voltage-frequency ratio is not surpassing the accepted range.
- Remote Monitoring: Check the status and alert system update accuracy for every connected monitoring system. Confirm all updates are accurate.
Correctly undertaken tests guarantee the dependable operation of the generator during outages and confirm compliance with specific technical criteria.
How long does it take to install a standby generator?
Timeline expectations for complete installation
The duration of standby generator installation depends on a myriad of factors such as site preparation, generator size, and permits and typically spans 1-5 days. Here’s a detailed explanation of the steps:
- Site Evaluation and Scheduling: The possibilities of installation are analyzed, load measurements are conducted, and the necessary permits are fetched. As an example, residential units typically need generators rated between 10 to 20 kW, whereas commercial units often require a minimum of 50 kW.
- Site Preparation: This entails setting up the foundation, specifically pouring a concrete slab, and getting the proper distances for safety around the generator vents (for example, typically 5 feet from combustible walls and at least18 inches from the house per most building codes).
- Connecting Electric and Gas: Automized Switch Transfer (ATS) integration with your electric cabinet is done by during these days, assuring they can sustain the load (E.g. ATS generally come in 50 amps to 400 amps depending on system requirements). As with gas lines, their flow capacity – commonly measured in BTU/hour must also be properly rated to guarantee efficient supply to the generator.
- Testing and Final Inspection: The system is put through load testing, voltage regulation checks, and local code versus manufacturer specifications checks for compliance. For example, the voltage put out should correspond with your region’s standard (i.e. 120V/240V for residential areas in the US).
Provided that all procedures are properly followed, a standby generator is set up and installed professionally to guarantee reliability and provide satisfactory service when there is a power outage.
Factors that might extend the installation process
- Site Preparation Requirements: Preparing the site for a standby generator requires some rudimentary site work like ground leveling, obstacle clearing, and building a foundation. Any alteration that includes excavation or additional grading will cause significant delays.
- Permitting and Inspections: Obtaining the appropriate permits and local authority inspection can cause major delays for reasons out of your control.
- Electrical Load Assessment: Customizing the generator installation to accommodate the required load demands may extend the process.
- Fuel Source Installation: If contractors or utility companies need to be coordinated to bring a dedicated fuel line, then this can cause some delays.
- Environmental or Weather Conditions: Harsh weather, particularly rain can delay work on the generator’s fuel portions, especially when digging and pouring concrete foundations. The delay can lead to increased temperature, which forces the concrete cure rate to be extended further.
Considering these factors beforehand can alleviate possible holdups, resulting in an easier and less complicated installation process.
What maintenance is required after installing a home generator?
Testing procedures to ensure peace of mind
To guarantee reliability during crucial periods when a home generator is required, ensuring periodic testing is done is pivotal. The following procedures should be performed:
- Load Testing: Under real-world conditions, perform a full load test to simulate the operation of the generator. Doing so will confirm whether the generator can handle the maximum load without failure. Its acceptable load range is defined in the manufacturer’s specification, most systems fall between 75 to100 percent of rated capacity.
- Automatic Transfer Switch (ATS) Functionality: Check if the ATS can switch seamlessly from grid to generator power and back.
- Voltage and Frequency Output: Adequate output from the generator should be checked with a multimeter or appropriate diagnostic tools. For most home generators, the acceptable voltage range is ±5% of 120/240V and the frequency is around 60 Hz ±1 Hz when under load conditions.
- Run Time Test: Any generator should be operated for a minimum duration as prescribed by the manufacturer which is normally around 20 to 30 minutes every month. During operation, watch for coolant levels, oil pressure, and exhaust output abnormalities.
- Battery Inspection: Check the voltage on the battery to ensure proper meter readings (most systems should be within the 12.4 to 12.9 volts range) and monitor that the charging system works properly. Clean any corrosion off the battery terminals to avoid power supply complications.
Complying with these testing steps outlined, coupled with professional intervention whenever abnormalities are noticed, will create confidence in the generator’s state of preparedness and parts interaction, including peace of mind in the servicing scope.
When to call a professional installer for service
It is recommended that a professional installer be consulted in situations as outlined below:
- Continuing Operational Problems: If the generator continues to show problems with starting or stopping mid-operations, even with regular scheduled maintenance. There could be problems such as contamination of the fuel systems, issues with the control systems, or damaged mechanical systems.
- Irregular Voltage or Frequencies: If there is a significant difference between the output voltage and the set standard (normally ±5% of the rated voltage which is 120V or 240V) or if there is a change in frequency, issue time prescribed tolerable limits (50 Hz or 60 Hz ± 0.5 Hz).
- Abnormal Noise or Mechanical Vibration: Suggest malfunctioning bearings, reasonably dressed rotors, poor mount, and some other systems that require further investigation and corrective actions.
- Fuel or Oil Draining: Relatively describes from system lubrication or fuel over long periods typically is the failure of system seals which leads to component cracking or poorly fitted joints and so requires for complete examination.
- Batteries: Need profound maintenance for checking and replacing if, during operation, the voltage of the battery repeatedly is less than (operating 12.4 voltage or 12.9 volts after charging, or the charging system appears to be dead even after terminal cleaning).
With the aid of modern diagnostic equipment and in-depth understanding of the specifications given by the manufacturer, the professionals are able to solve these problems effectively. Remember that trying to elaborate on complex repairs without any training will result in more damage.
Reference sources
Frequently Asked Questions (FAQs)
Q: What are the benefits of a home standby generator?
A: A home standby generator provides reliable backup power during outages, allowing you to maintain your normal lifestyle when you lose power. Unlike portable generators, standby generators start automatically when utility power fails, can power your entire house including HVAC systems and home appliances, and run on natural gas or propane for extended periods.
Q: What is the average cost to install a whole-house generator?
A: The installation cost for a whole-house generator typically ranges from $4,000 to $10,000, not including the generator itself. Factors affecting the installation cost include: the complexity of your electrical system, whether a gas line needs to be installed or upgraded, permit requirements, the location where the generator will go, and whether a new concrete pad is needed.
Q: How does a home standby generator differ from a portable generator?
A: A home standby generator is permanently installed outside your home and connects directly to your electrical system, automatically providing backup power when an outage occurs. In contrast, a portable generator must be manually set up, fueled, started, and connected when you lose power. Standby generators typically run on natural gas or propane from existing lines, while portable generators require gasoline refills. Though a portable generator costs less initially ($300-$1,500), a standby generator offers greater convenience, can power your whole home, operates more quietly, and provides seamless power transfer.
Q: What’s involved in the process of installing a generator at my home?
A: To install your standby generator, the process typically involves: (1) Site evaluation by one or more authorized Generac dealers to determine the best location and proper sizing; (2) Obtaining necessary permits from local authorities; (3) Pouring a concrete pad where the generator will go; (4) Installing a transfer switch to connect to your home’s electrical panel; (5) Running a gas line if needed; (6) Placing and connecting the generator unit; (7) Testing all systems. The entire installation typically takes 1-3 days depending on complexity. For safety and warranty purposes, it’s best to have the generator installed by qualified professionals rather than attempting DIY installation.
Q: How long does it take to install a standby generator?
A: The timeline to install your standby generator typically spans 1-3 days for the actual installation work, though the entire process from initial consultation to completion may take 2-4 weeks. The installation itself involves placing the unit, connecting the gas line, installing the transfer switch, and testing the system. Weather conditions, permitting delays, or the need for extensive electrical work can extend this timeline. Planning before the storm season arrives ensures you’re not without backup power when you need it most.
Q: What maintenance is required after I install the generator?
A: After you install a generator, regular maintenance is essential to ensure reliability during power outages. Typical generator maintenance includes checking and changing oil, air filter and spark plug replacement, battery testing, and inspecting fuel lines and connections.
Q: Where should I install my standby generator around my home?
A: When deciding where your generator will go, follow these guidelines: Place it at least 5 feet from doors, windows, and fresh air intakes to prevent exhaust from entering your home. Maintain minimum clearances (typically 18-36 inches) from structures for proper ventilation and maintenance access. Position it away from high-traffic areas and bedrooms to minimize noise disturbance. Consider local zoning requirements and HOA restrictions that may dictate placement. Select a location with easy access for maintenance and that allows for proper drainage. The ideal installation spot is typically along the side of your home near your electrical panel and gas meter to minimize installation costs.