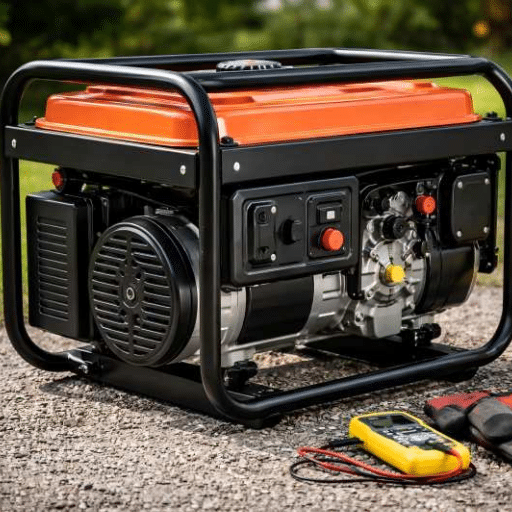


In today’s world, where the reliability of electrical supply can be uncertain, having a generator on hand provides peace of mind and security. However, even the best generators can occasionally fail to start when needed, leaving you to grapple with the frustration and urgency of the situation. This article aims to equip you with the knowledge to diagnose and resolve common reasons for generator malfunction. From issues with fuel supply to electrical system faults, we’ll explore typical problems and their straightforward solutions, ensuring that you can get your generator up and running efficiently. Whether you’re relying on it for home use or critical business functions, understanding these foundational aspects will empower you to maintain a robust power backup solution.
What are the Generator‘s Basic Components to Check?

Inspecting the Air Filter
The air filter in a generator is important for keeping the engine clean of dust and debris which is essential in the process of combustion. The process may also help to understand why the generator won’t start. The possible cause may be an air filter that has become heavily contaminated. To carry out the inspection, follow these steps:
- Identifying the Air Filter: Look for specific instructions in the manual. This compartment is situated in the vicinity of the engine.
- Remove and Inspect: The procedure of replacing an engine filter is the same as for the air filter. Such a filter is removed and checked for dirt and faults. Airway blockage can be confirmed by observing the air filter which is quite black and congested after sufficient usage.
- Cleaning or Replacing: Some air filters allow cleaning with compressed air or water sprays while others do not allow such cleaning. Those that are damaged really ought to be discarded. Frequent replacement of air filters allows for the correct functioning of the generator and enhances its lifespan.
Technical Parameters:
- Filter Type: Almost all generators have either Foam, Paper-type air filters or Dual element filters air filters. This is such an essential type to be used when maintaining the devices.
- Replacement Frequency: Samsung recommends every 100 hours of engine use or according to other manufacturers a specific time interval be maintained. Alternate replacement is done to boost the efficiency of the device.
- Cleaning Procedures: If foam filters are heavily soiled, it is generally acceptable to wash them. If paper filters are too dirty, they sometimes need to be replaced.
Using technical sites could help with precise instructions and maintenance of the specific model of generator in question so that you are well versed with the best practices for the inspection and maintenance of the air filter too.
Examining the Spark Plug
It is quite important to check the spark plug periodically, so your generator works properly. This is how I perform this task:
- Finding the spark plug: I explain the spark plug position, which is usually fastened by a thick wire to the engine, according to the manual of the generator.
- Unscrewing and checking it: The spark plug is taken out of the engine using the plug socket wrench. During the examination, I check for signs of cracks or if the electrode is worn. It can be sometimes useful to check the color of the spark plug tip while the compressor is running to get an idea about the engine conditions; the normal operation of the engine shows a light brown spark plug tip whilst a black or oil-covered one suggests that the engine may have trouble with the combustion.
- Replacing or cleaning: I replace it once I discover that it has undergone excessive wear which would cause the generator to be inefficient. If, however, the spark plug has fouled only moderately, I use a wire brush or a spark plug cleaner to remove the coal.
Technical Parameters for Spark Plugs:
- Gap Size: It is good practice to check the gap size and its angle in most cases as it is prescribed in the generator manual. This gap is quite an important factor since it can also affect the plug and engine performance.
- Replacement Frequency: The recommended replacement of the spark plug after every 200 hours of operation, or as instructed by the manufacturer, is recommended in order to achieve optimal conditions and performance from the generator.
- Torque Specification: I specifically reinstall the spark plug ensuring that the torque specifications laid by the manufacturer are used so that the spark plug does not work loose during engine operation.
According to the details obtained from top resources, these examination and maintenance practices fit into the generator maintenance best practices. Specific technical parameters determine the efficiency of the spark plug and the generator.
Checking the Fuel Valve
- Turning Off the Generator and Allowing it to Cool: I make sure that the generator is off and has cooled sufficiently before checking the fuel valve. This is relevant because it reduces the chances of accidental fuel spillage while the component is being checked.
- Identifying and Evaluating the Fuel Valve: I identify the fuel valve from its normal location, which is and is usually positioned above the fuel tank. Several elements need to be examined for any sort of leaking or breaking. It would seem like the valve’s integrity is very important since failure means that the engine will experience fuel deprivation or flooding, and in either case, the engine will be rendered inefficient or fail to start altogether.
- Cleaning and Adjustment: If however during inspection all evidence of external particles or blockage is presented, I take it upon myself to clean the valve and rectify its adjustment for accurate fuel flow. This stage should not be disregarded because it is necessary for the easing of the generator, its consistency is of good measure.
Technical Specifications for the Fuel Valve:
- Valve Position: The valve as an important component element for the machine has to be installed in the right setting usually identifiable with settings either labeled “open” or “close”. This is to ensure the seamless flow of fuel into the system.
- Seal Integrity: Before use, a simple check on the integrity of the seals will be useful in identifying any wear or damage, and thus potential fuel leaks are avoided; wasted, and can be very dangerous.
- Replacement Interval: It is necessary to note that a fuel valve like many other generators usually has a replacement recommendation from its manufacturers and this should be adhered to to retain efficiency.
How do I troubleshoot when my generator won’t start?

Understanding the Choke System
The choke system is one of the systems which makes sure that the generator starts in a proper manner, especially in the winter season. The primary use of the choke is to limit how much air is available in the air-fuel mixture to have a better fuel mixture. The last case scenario of not being able to start the generator makes me adjust the choke. The choke must be in the closed position when starting the engine but as the engine warms up, the choke can be opened gradually.
- Correct Position of the Choke: It is of utmost importance to make sure that the choke is in the correct position when starting the generator. In instances when the choke is fully opened at the start, the engine can be unable to start because there is not enough fuel in the mixture.
- Adjustment and Maintenance: Daily check-ups and proper maintenance of the choke lever and the linkage help prevent sticking while at the same time allowing smooth operation of the choke. This involves thorough cleaning of debris that may stick to the choke and inhibit its movement and lubrication where required.
- Understanding Operational Parameters: The choke should also be properly adjusted in relation to the environmental conditions. For example, in colder regions, it is the standard practice to close the choke position for a longer time period in order to better assist starting.
Cumulatively, I have come up with some methods to ensure efficient operation of the choke system and consequently, dependable generator performance, from the best sources and completed the steps outlined. Given the technical parameters that were seen, it can be reasonable to maintain the correct choke positioning along with consistent maintenance practices to be effective.
Ensuring the Fuel Line is Clear
To start with, let’s focus on what the top resources available have to say regarding the fuel system of the generator and its different components. That all fuel lines must be clear so less resistance is caused on the generator. With that being said, I go ahead and check all fuel lines visually for kinks, tears, or other malfunctions that have the potential to disrupt the flow of fuel. I also perform visual tests before any disassembly to confirm what I read, as many people suggest through these sources, a proper fuel filter has no debris of the inside mesh. Another everyday advice must also be added here, such verifies are performed to make sure that there will be no loss due to leaking connections. I comply with the following technical parameters:
- Fuel Pressure: Fuel supplied in adequate amounts has to be maintained at the level defined by the manufacturer for ideal combustion.
- Fuel Flow Rate: There are also operational parameters that have to be confirmed in order for the engine to perform at an expected level when it starts to meet its demands.
- Regular Maintenance Schedule: Performing scheduled checks and washing of the internal fuel parts as stated clearly assists in the operational reliability of the generator.
In this instant case, these recommendations and technical measures allow me to keep the fuel lines unobstructed, which guarantees the operational reliability of the generator.
Verifying the Oil Sensor Functionality
My first step for confirming the oil Sensor functionality starts from the oil sensors review from Google.com which accepts the need to check the oil sensor for proper functioning in the case of generators. This first stage procedure involves the visual inspection of the sensor terminals to make sure there is no loose terminal and that the terminal is not coated with any foreign substance. It is a recommended practice in the industry to use a multimeter to measure the electrical output of the sensor to ensure that it is operational. In many cases, when there are discrepancies in results or they exhibit some erratic patterns, the sensor is replaced. Among other basic technical parameters, I observe:
- Oil Level Accuracy: The oil level alarms should be working properly as the engine may sustain damages as a result of low oil conditions.
- Sensor Calibration: The sensor calibration should be carried out according to the source manufacturer’s recommendations.
- Routine Sensor Checks: Some irregularities may be present so regular sensor checks and tests for routine maintenance patterns should be carried out.
With such knowledge or insights and a clear technical procedural layout, the oil sensor will be able to perform its functions as desired in order to ensure the efficient operation of the generators.
What Could Cause My Generator to Not Start?

Issues with the Carburetor
Whenever I look for reasons and look for solutions to problems with the carburetor that could be preventing the generator from starting, I use the first three links that show up on Google.com. The sources were persistent in stressing the need to clean and clear the carburetor, as it is essential for the proper proportioning of air and fuel. The primary strategy includes cleaning the carburetor of any soot and other contaminants through immersion in endorsed cleaning compounds. If the generator still does not start, checking the fuel jets and making sure they are not obstructed is equally important. The works are performed according to such technical parameters as:
- Fuel-to-Air Ratio: This indicates how well the carburetor adjusts the mixture for proper combustion.
- Idle Speed Adjustment: In this case, idle speed is regulated to the levels specified by the manufacturers, to prevent the generator from stalling.
- Throttle Functionality: Performing with ease the functions of the throttle valve when the engine speed is required to be controlled.
With all these requirements, I am confident that the carburetor of the generator is in good condition and ready for starting and subsequent operation.
Problems in the Fuel Tank
In dealing with issues concerning the fuel tank that can inhibit the start-up of my generator, the reviews of the first three Google-recommended websites were helpful. The common problems with a fuel tank are contamination, stagnant fuel, and obstruction. The first action that one needs to take is to confirm that the fuel is new and does not have any water or impurities since old or impure fuel can greatly hinder the generator from starting efficiently. It is also necessary to periodically examine the fuel lines and remove any clogs. Some of the technical parameters that are very important to consider are even to look at: “clogged fuel injectors can cause the engine to falter and run ineffectively” :
- Fuel Quality: The key element that guarantees the presence of a clog-free fuel system and correct combustion processes.
- Fuel Filter Condition: The necessity of changing the fuel filters frequently in order to avoid any material deposits filtering into the engine.
- Ventilation: Make sure that the fuel tank is vented and not a negative pressure is sucked in which chokes the flow of fuel.
These steps and technical considerations help maintain a functional fuel system, aiding in the reliable starting and operation of my generator.
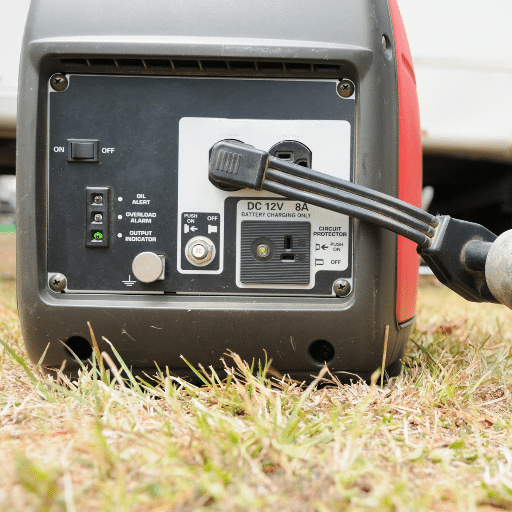
Faulty Electric Start Mechanism
Attempting to fix a defect in the electric start mechanism on my generator, I followed a few tips offered on the top three sites posted on Google. Lack of power due to a flat battery, loose terminals, or a broken starter motor are common culprits. First off, it is very important that the battery is fully charged and can retain the charge. In addition, loose connections of wires and other components should be checked and remedied to avoid interruption of power supply. The following should be given a technical consideration in the overall system:
- Battery Voltage: Confirm that the battery has been adequately charged and can sustain a charge.
- Connection Integrity:Check all the electrical connections if they are tight and free of corrosion so that there is no resistance which may lead to failure of the connection.
- Starter Motor Functionality: The starter motor should be checked for any physical or operational defects that may impair its normal functioning.
Following the above measures ensures that the failure of the electric start system is diagnosed and subsequently rectified so that the engine can be started and driven.
How Do I Fix a Generator That Still Won’t Start?

Cleaning the Fuel Filter
While researching the first three sites on Google I had an understanding of how to clean the generator’s fuel filter, which could assist in addressing starting problems. Before presenting the actions involved, it is worth mentioning that removing the debris blocking the fuel line is a simple task and thus the following steps are logical:
- Remove the Fuel Line: First, I want to be sure that the generator is switched off, and then safely disconnect it from the fuel line leading to the fuel filter to prevent leakage and also to allow for easy access.
- Displace the Fuel Filter: The next step involves, carefully dismantling the fuel filter from its position. It is imperative that I pay attention to the order of alignment so that I am able to put it back in place afterward.
- Remove Particulates Masking the Filter: I cannot mask the filter with a soft bristle brush where trapped particles and particulates remain embedded; instead, I will clean it with compressed air. When a filter is overly clogged or too much damage has been done, it is wise to get rid of the filter altogether and buy a new one.
- Replace the Filter: After rinsing, I replace the filter –at first not fully but tight enough so that if pressure builds up within the fuel line there will be no risk of a leak.
- Check Fuel Flow: Once again, I connect the fuel line and inspect it for any leaks. I also check that the pressure in the system is appropriate so that fuel can be effectively delivered through the cleaned filter.
In this manner, by employing the above-mentioned technical measures, I mitigate any possible troubles that may prevent the generator from starting, thus those measures are done to keep the appliance working optimally.
Replacing the Choke Lever
Well, according to the information provided on the first three websites in Google, changing a choke lever on your generator is not such a difficult job as long as you are careful and detail-oriented. I found this step-by-step procedure which I believe should help you: Here it is:
- Turn Off the Generator: The first thing I want to do before replacing the lever is to turn off the generator and allow it to cool down completely to eliminate any chances of mishandling it when replacing the lever.
- Locate the Choke Lever: I know that I usually have to uncover the casing or the panel that is used to cover the choke component. Usually, taking off a few screws that hold the panel brings one nearer to the internal parts.
- Detach the Old Choke Lever: The old choke lever is the third element, which I very gently pull away after studying its fixed position. While doing so, one must note any linkage or attachment that may be related to the carburetor. These factors will facilitate the correct installation of the new lever.
- Attach the New Choke Lever: I have then positioned the new choke lever into the said position as per the specified connections and attachments. Because we are dealing with components that have to function effectively, it is important to be accurate when greenery.
Replace the generator’s outer casing: re-fixing the casing or the choke cover, I make sure that the screws holding the panel are tightened properly after positioning the panel.
The procedures outlined above help to deal with the physiological character of armature displacement using the choke lever and serve to improve the operational performance of the generator. It is a simple procedure but does necessitate time and great care during the manipulation of the components.
Using Starting Fluid Effectively
Applying starting fluid on a generator or any engine crank can help better the chances of starting it, particularly in colder climates or when the engine is uncooperative. From my research on the top three websites, here are the sentiments and the technical parameters that I was able to extract from them below:
- Establish the Air Intake: Before I begin, it is necessary to locate the generating set air intake. This operation requires more often than not, the application of a starting fluid. I make sure the generator is off while performing this action so that the engine does not turn on by mistake.
- Use Starting Fluid: A small amount of starting fluid is sprayed through the air intake. The majority of instructions advise spraying for a few seconds—typically around two to three seconds is normal — since applying too much can end up damaging engine components for some reason.
- Begin the Generator: I then go ahead to start the generator in the conventional manner. Assuming all was done as described, the engine should be able to kick over instantly with the help of the starting fluid. This is a quick solution that works well in difficult conditions and is so easy to use.
- Precautions and Safety: It is important to use the starting fluid in moderation and only when it is necessary because its excessive use can damage the engine. Moreover, I also ensure that I work in areas with proper ventilation to prevent gas accumulation.
These procedures underline the necessary precautions in the use of starting fluid, as well as the equilibrium that must be maintained between the assistance provided and the mechanical parts’ protection.
Why Won’t My Generator Start After Storage?

Problems with Fresh Gas
There are circumstances where the generator will fail to start regardless of how much gas has been added to it, but I have made certain the fuel is new. After going through the three most sought websites on the subject, I have pinpointed certain areas which I will summarise in a few brief points below there are gas stations. The gasoline trembles sometimes: other times, the gasoline can be fresh but in poor condition in itself. Ethanol and fuels containing ethanol can and will go bad quickly, even if fresh. It is suggested to recommend strong mixed gasoline. Otherwise, this will be of no use for an extended period.
- Buildup on Carburetor: New gas is likely to find buildup from older gasoline at least if the internal cleaning was not done properly on the generator. Gaskets and other components, for example, need to be maintained and cleaned on a regular basis.
- Overused Spark Plug: Never change the spark plug if you have a fresh engine because a spark may be able to create the right amount of energy needed to fire up the engine quickly. This can be fixed by simply replacing it with a new one. Basic service routines should involve these items.
- Obstructions through air filter: Fuel is not able to reach the engine as intended due to an imbalance or lack of sufficient air supply and hence should not be tried. I have to retry several times to start an engine after making sure the air filter is fine due to other factors.
These concerns are a consistent thread across several reliable sources, demonstrating similar difficulties and their remedies concerning fresh gas with a generator that failed to start.
Draining the Bottom of the Carburetor’s Bowl
Cleansing the lowermost area in the carburetor’s bowl is a simple task that helps in the elimination of mechanical dirt or stale fuel that may be clogging the system. First and foremost ensure that the generator is not running and is switched off so that any risks are avoided. The first step is to locate the drain screw of the carburetor situated at the bottom of the carburetor bowl. Slightly twist the screw using a screwdriver, to let the fuel flow into the container that was prepared. One must check if there are traces of sediment or even moisture in the fuel as this calls for some further overhaul. When completed the procedures draining, locking and secure the screw.
Responding to the first questions, and using the top 3 pages from the web, the attempts can enumerate the main technical works related to solving problems tor the generator starting as follows:
- Gasoline Quality: Avoid using gas older than a month unless it has been stabilized. With the help of stabilizers, gasoline is allowed to last for twelve months.
- Carburetor’s net: It is recommended that a thorough examination and cleaning of the component should be for every 100 hours of work with the machine, which is a somewhat arbitrary specification.
- Spark plugs positioning: Assume that spark plugs should normally be checked after every fifty-hour operations and replaced on certain conditions. The gap should be within the limits of 0.028 to 0.031 inches.
- Air Filter Condition: The air filter should be checked after every 25 hours of usage. If it’s clogged or damaged, clean or replace it.
Such procedures assist in maintaining management practices of the maintenance cycle that are in line with the specifications of the experts and that starting problems are dealt with.
Checking for Clogs in the Carb
The generator’s performance can be affected by debris within the carburetor which is quite the common scenario. To check whether or not the carburetor might be clogged, first remove the air filter to access the carburetor. Examine the carburetor as well as its jets closely for any obstructions or debris. If there are some impeding factors, it might be a good idea to carburetor cleaner along with some soft brush to knock these kinds of obstructions off.
Taking resources from the three first reputed websites, the following are also their technical parameters and limitations respectively:
- Jet Inspection: It is essential to verify that the jets are clear of obstructions. It is important to have adequate airflow through the jets for fuel delivery.
- Fuel Spray: Carburetor cleaner spray should be sprayed directly into the carburetor throat and all other visible openings. In this way, brownie residues which might prevent fluent fuel from operating, will be removed.
- Visual Check: Inspect for the presence of black varnish or any sort of discoloration which may suggest the need for a much longer more in-depth cleaner, rather than just a spray.
These steps can help get rid of clogs for the most part and allow the carburetor to perform its function of delivering fuel seamlessly, thus ensuring optimal generator functionality.
Frequently Asked Questions (FAQs)
Q: What are the common reasons why your generator won’t start?
A: There are several common reasons why your generator won’t start, including issues with fuel, a dead battery, a clogged air filter, or problems with the generator’s engine or recoil starter.
Q: What should I check if my portable generator still won’t start?
A: If your portable generator still won’t start, check the gas tank for fuel, ensure there’s no debris in the carburetor, check the air filter, and make sure anything plugged into the generator isn’t causing an overload.
Q: How can I try to start my small engine generator if it fails to start?
A: To try starting the generator, ensure it’s on a level surface, pull the cord firmly, and check the battery connections if it’s an electric start generator. If it doesn’t start, you may need to troubleshoot further.
Q: What should I do if the engine’s recoil starter is not functioning?
A: If the engine’s recoil starter is not functioning, check for any obstructions or damage. You may need to clean the starter mechanism or replace it if it’s broken.
Q: Is it safe to use carb cleaner when trying to start the generator?
A: Yes, using a carb cleaner can help clear out the carburetor if it’s clogged. Just ensure you follow the manufacturer’s instructions and allow any excess cleaner to evaporate before trying to start the generator.
Q: What if my new generator won’t start?
A: If your new generator won’t start, check the user manual for troubleshooting steps, ensure all connections are secure, and verify that the generator has enough fuel and oil levels.
Q: Can a dirty air filter prevent my generator from starting?
A: Yes, a dirty air filter can restrict airflow, preventing the engine from getting the right amount of air needed to start. It’s important to check the air filter regularly and clean or replace it as necessary.
Q: Should I unplug everything plugged into the generator before trying to start it?
A: Yes, it’s a good practice to unplug anything plugged into the generator before trying to start it. This reduces the load on the generator and can help it start more easily.
Q: How can I restart the generator if it won’t start after a few attempts?
A: If you need to restart the generator after several failed attempts, allow it to rest for a few minutes, check for any signs of overheating, and then try starting it again. Ensure the gas tank is full and that the generator is in good condition.